0 - Introduction
1 - Introduction
This is the Room-House Tower Owner's Manual. It is intended as a guide on how to operate the basics of Room-House Tower, as well as an introduction to some advanced features. It is organised into major sections as well as more detailed subsections and these are laid out in the Table of Contents. The first section deals with downloading, installing, and running Room-House Tower. The second section is an overview of configuring Room-House Tower. Reading those two sections is enough to get you started. The remaining sections cover more advanced features and further configuration options in greater depth.
Resources
- Room-House Homepage
- Telegram Official
- Twitter/X Official
- Explorer
- Explorer Legacy
- Subscan
- Support E-mail Address
Developer Resources
2 - What is Room-House Tower
Room-House Tower is a container implementation of Room-House which is a Free and Open Source (FOSS) software. Room-House Tower is designed with performance, configurability, and extensibility in mind. The server is written in Java, and there is an extensive layer in Javascript client browser code.
3 - History
Room-House was created in early 2021 by kl3eo (a.k.a. Alex Shevlaquov) as a study and replacement for the Kurento's team Java client/server sample app. It's designed with a purpose to be better performing and more configurable than the original sample app. It has since been run inside the xTER SafeContainer to make its deploy as easy as possible. Room-House inside an xTER makes up the basis for the Room-House Tower.
1 - Installing
1 - Requirements
Make sure your router has a static IP in internet. This is necessary to access R-H Tower from outside. 6Gb RAM at least is required of the host as well as 4 Gb of free space specially for R-H files.
Technically Room-House Tower is a Linux virtual machine that runs inside VirtualBox (C) by Oracle. On Linux, macOS, Windows, you can simply install VirtualBox from Oracle's site virtualbox.org. No extension pack is required. The oldest tested version of VB to run Room-House is 6.1.22. The newest supported one is 6.1.50. -- Please notice that for Room-House Tower we do not RECOMMEND the use of the 7.* VirtualBox versions since they are not Licence compatible, and they ARE WITH known issues.
2 - Setting up the Virtual Machine
The simplest way is to use our setup scripts fow Windows or Linux/macOS. Before running any of them, download the small boot file "loop_rh_demo.vdi" from github . On Linux, place it to "/opt" folder where the script will find it. On Windows, place it to the new folder which is created by the script (see the code).
Start the graphics VirtualBox Manager to see the details. On Linux, make sure the "vboxdrv" driver is active with "service vboxdrv status" command.
Linux/macOS
On Linux or Mac, here is our script to create the virtual machine name "RH".
#!/bin/bash

mkdir -p ~/VB && cd ~/VB

if [ -f /opt/loop_rh_demo.vdi ]; then
        cp -a /opt/loop_rh_demo.vdi ./
else
        echo File /opt/loop_rh_demo.vdi not found. Exiting
        exit
fi

vboxmanage createvm --name RH --ostype RedHat_64 --register --basefolder `pwd`
mv loop_rh_demo.vdi RH/ && cd RH
vboxmanage modifyvm RH --memory 6144 --cpus 4 --audio none --firmware efi --nic1 bridged --nictype1 virtio --bridgeadapter1 enp0s31f6
vboxmanage createmedium --filename 4GDEMO.vdi --size 4096
vboxmanage storagectl RH --name SATA --add sata
vboxmanage storageattach RH --storagectl SATA --medium loop_rh_demo.vdi --port 0 --type hdd
vboxmanage storageattach RH --storagectl SATA --medium 4GDEMO.vdi --port 1 --type hdd
vboxmanage modifyvm RH --boot1 disk --boot2 none --boot3 none --boot4 none
Windows
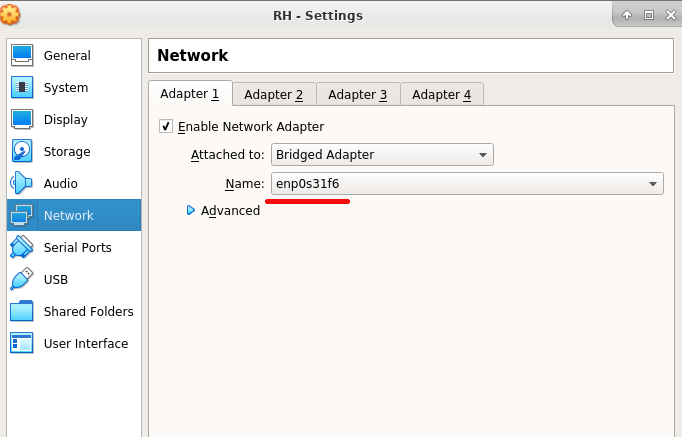
If you prefer to run on Windows, here is our script for it - replace "Bob" with your Windows user's name, then please run each of nine commands one by one, #1..#9 to make sure every one is successful. If you encountered an error, remove the "RH" virtual machine in the graphics VirtualBox Manager, then start from the scratch. Also replace "Intel(R) Ethernet Connection I219-LM" in command #3 with your host's network adapter's name. You can learn what it is from the graphics VirtualBox Manager (see picture). Copy the adapter's name from there and paste it between the quotes after the --bridgeadapter1 flag where now it's "Intel(R) Ethernet Connection I219-LM".
1. vboxmanage createvm --name RH --ostype RedHat_64 --register --basefolder "C:\Users\Bob\VMs"
2. cd "C:\Users\Bob\VMs\RH"
3. vboxmanage modifyvm RH --memory 6144 --cpus 4 --audio none --firmware efi --nic1 bridged --nictype1 virtio --bridgeadapter1 "Intel(R) Ethernet Connection I219-LM"
4. vboxmanage createmedium --filename 4GDEMO.vdi --size 4096
5. vboxmanage storagectl RH --name SATA --add sata
Now download "loop_rh_demo.vdi" from github link above and place it to the same folder where you're running commands (it's "C:\Users\Bob\VMs\RH"), and proceed with command #6.
6. vboxmanage internalcommands sethduuid loop_rh_demo.vdi
7. vboxmanage storageattach RH --storagectl SATA --medium loop_rh_demo.vdi --port 0 --type hdd
8. vboxmanage storageattach RH --storagectl SATA --medium 4GDEMO.vdi --port 1 --type hdd
9. vboxmanage modifyvm RH --boot1 disk --boot2 none --boot3 none --boot4 none
3 - Starting Tower
Once you have successfully created the "RH" virtual machine, click on the "Start" button in the graphics VirtualBox Manager's menu. Next, you will see the blue screen with 5 fields, where only first four fields are required. Fill these fields one by one:
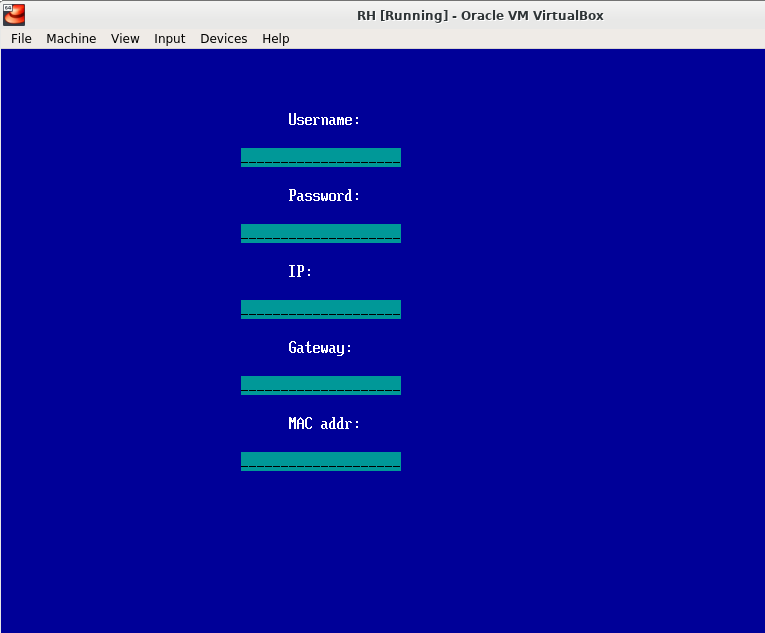
1. Username - type "demo" 2. Password - type "demo" 3. IP - type ANY free IP address from your local subnet. If your router is "192.168.0.1" and your host computer is "192.168.0.10", then may be "192.168.0.100" is free? You can try it. 4. Gateway - type "192.168.0.1" or "192.168.1.1" or whatever your local subnet router's internal IP is. 5. Leave it blank, it's not required now.
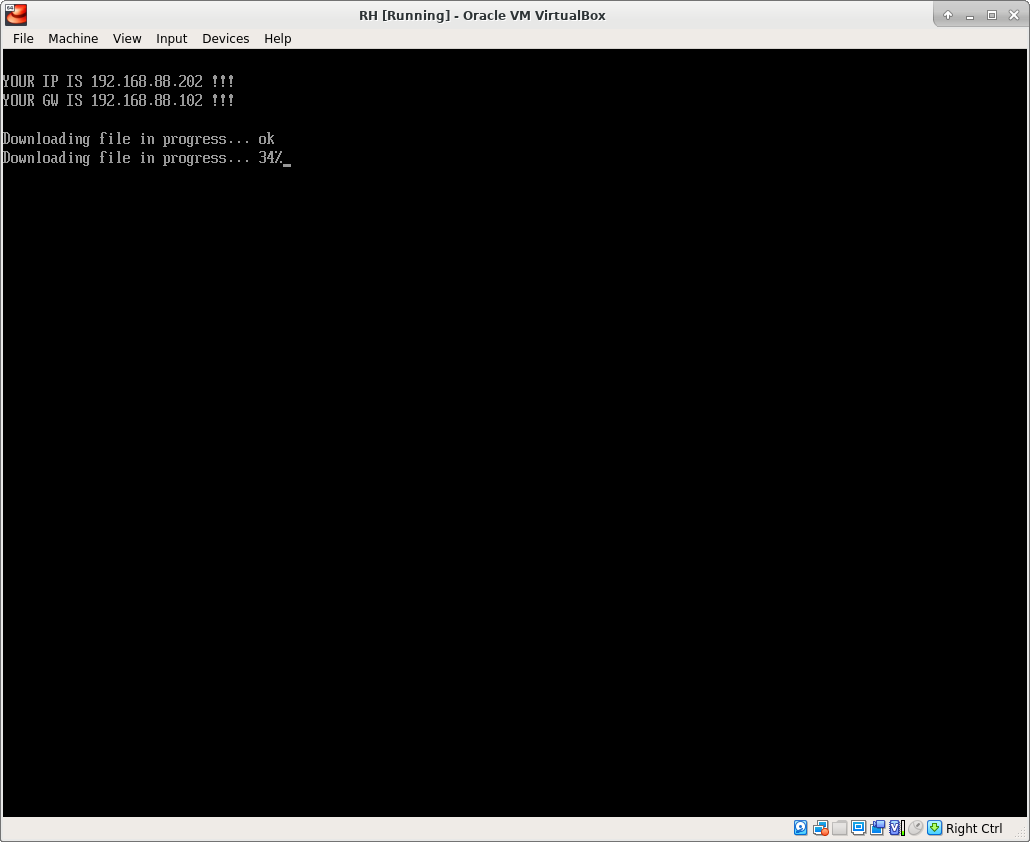
Wait patiently and see what is going on, it may take some minutes to download, unpack and start all the software on your VM.
Once this process has finished, you will see the "login" prompt on the bottom line (see pictures).
Downloading..
..Unpacking & Starting services..
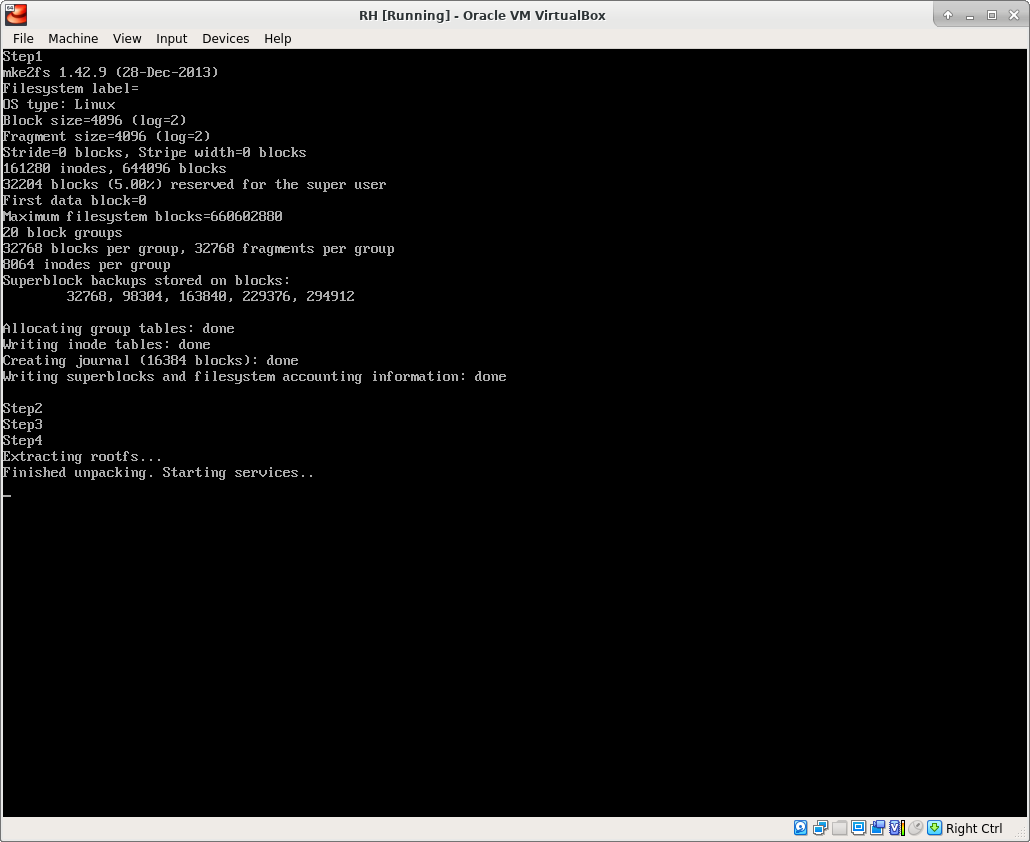
..Complete
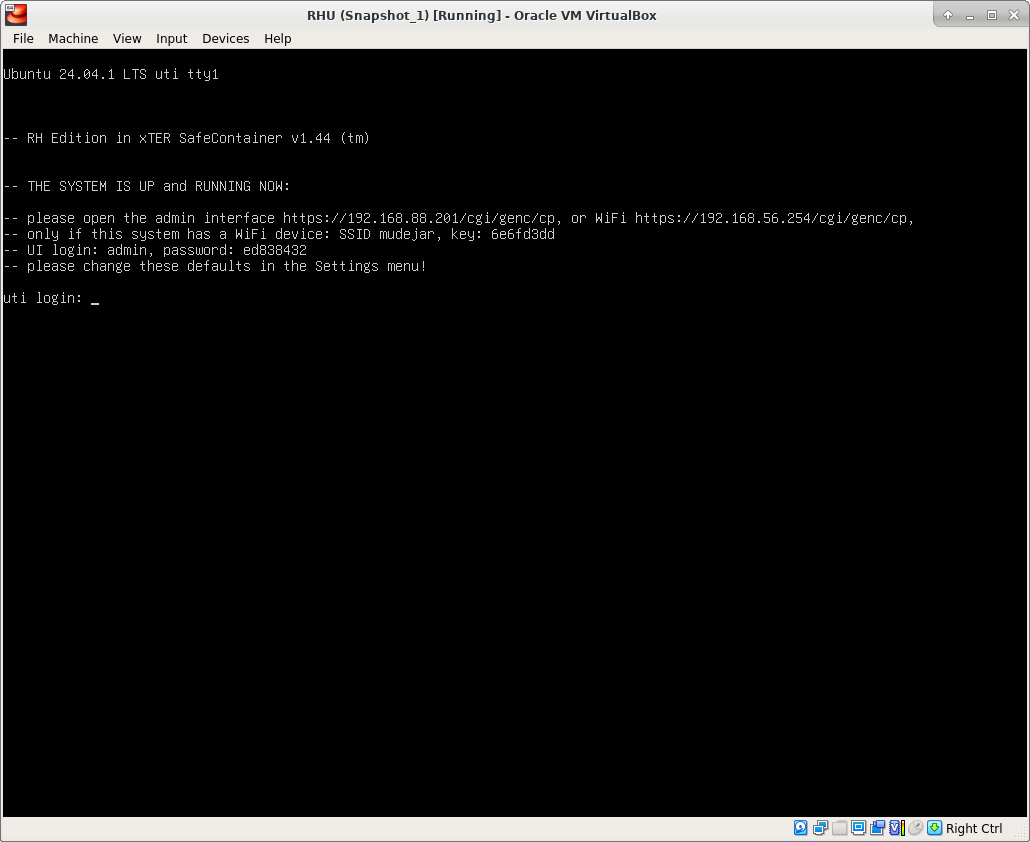
In this example picture above, the tower's name default is "uti", and its internal IP was chosen "192.168.88.201" on the blue screen, because our local subnet is "192.168.88.0/24".
2 - Configuration Basics
1 - Configuration Overview
Room-House Tower can be configured by editing options in WebAdmin interface. Below is a list of WebAdmin menus:
- Settings
- The main configuration menu which contains server-wide configuration variables.
- Users
- Can add/edit/remove Tenants and separately add/edit/remove Aparts. Also can bind an Apart to a Tenant which becomes its master.
- Stats
- Each Tower generates traffic which is valuable and we're accounting the Room-House coins for it.
- Info
- Allows you to tweak server processes, free space, restart Kurento and more.
2 - Login & Password
Login allows different users to access different features in WebAdmin. Each login has its own permissions. Setting up user login is easily done via the WebAdmin.
The Room-House Tower owner's login is "admin" and in Settings there is a way to change the admin's password.
The Room-House Tower owner and admin are the same, the first thing the admin MUST DO is CHANGE THE DEFAULT ADMIN'S PASSWORD!
Go to Settings menu, click on "change" next to "Admin key" and replace the default "parol765" with some word(s) - but IT IS NOT THE PASSWORD!!!, press Enter and then write down the new password which shows up. Or later, you may click on the red exclamation [!].
Please write down the admin's new password which shows after clicking on the red exclamation [!]. After that, click on "Save" and re-login, testing your new admin password.
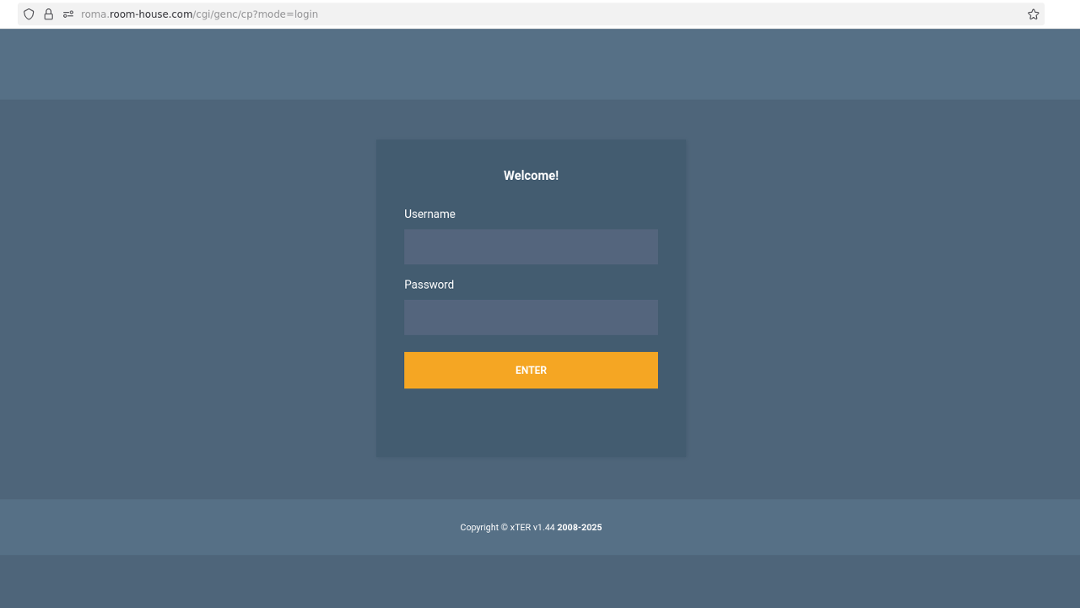
To access the WebAdmin after the first Tower startup, go to URL: "https://192.168.8.100/cgi/genc/cp" - here we assume "192.168.0.100" is IP you've chosen on the "blue screen" during the startup.
Please ignore the browser warning or complaining about the wrong certificate, because you're accessing the internal local IP and not the fully qualified DNS name, while the certificate is good only for the latter. Enter "admin" into the top field, and "ed838432" into the password field. This is the default admin's password that you must change now.
Please CHANGE the admin's password in the Settings menu as we have already urged you to do!
3 - Settings
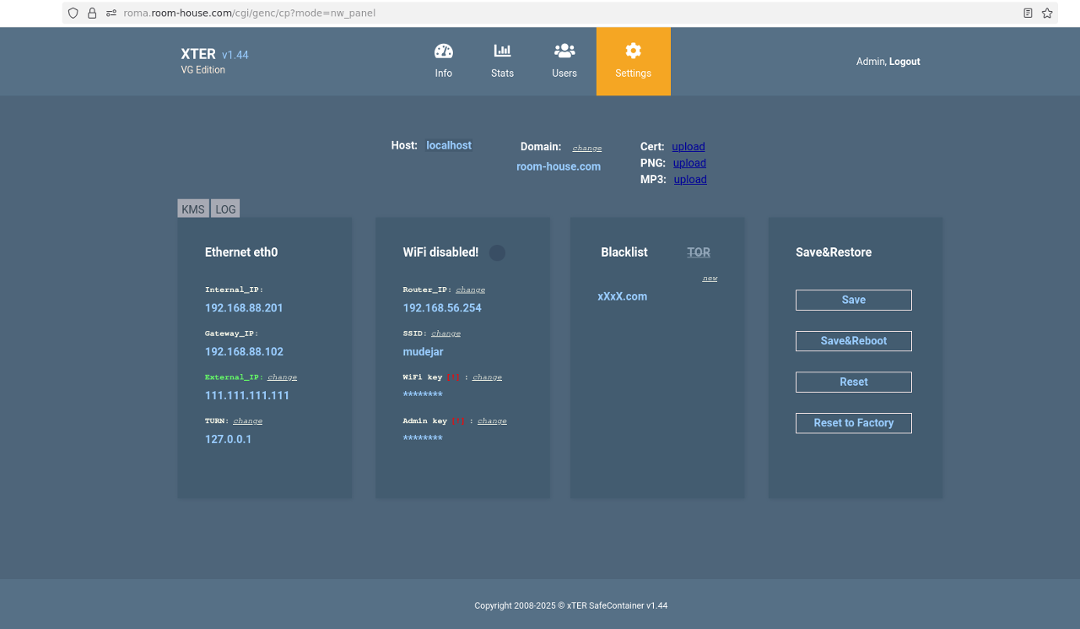
Because you are using VirtualBox environment, there is no Wi-Fi on this system.
Now change the "Host" to your host name, and domain to your domain name. If you change "Host" to "online", and domain to "mydomain.com", then your Tower has an URL "https://online.mydomain.com".
Change the bogus "External_IP" (111.111.111.111) to the static IP of your router. Wait 10 sec for Kurento reload.
NB: you may need to do it manually if the auto-reload fails. Go to Info menu and check that Kurento is running - if not, restart it with a button.
Do save the changes you've made clicking the top button in the right column. This will send you back to Login screen.
Check if the URL "https://online.mydomain.com" is accessible in the internet. It will eventually be, if not already, - first you'd have to do the correct "Port Forwarding". - Read the next Chapter of this Manual how to do it.
To work correctly, upload your "cert.pem" and "key.pem" for "online.mydomain.com" - you can make them in Certbot, but make sure to use --key-type rsa flag with Certbot. If you use another algorithm making keys, there's an error while uploading them.
After success in uploading new RSA certs, wait for about 1 min till you see "OK", then your Tower has your own domain name.
4 - Port Forwarding
To access Room-House from internet, TCP port 443 must be open. This is very true when your host has a direct link to internet. However, in most cases it is behind the firewall of your router. This is why the port forwarding is required. From the router, requests are forwarded to TCP port 443 on "192.168.0.100" which is what you've assigned to the VM and typed in the "blue screen" form during the startup. Now you have to configure the "Port Forwarding" on your router. If the router's port 443 is not busy yet, assign this port to be forwarded to "192.168.0.100" port 443. But if it is busy, like by the host's Apache running on it, configure your host's Apache config to proxy based on "name.domain" to your virtual machine's Apache: (see example)
Header always set Strict-Transport-Security "max-age=0; includeSubdomains;"
Header set Access-Control-Allow-Origin "*"
Header set Access-Control-Allow-Credentials "true"
Header set Access-Control-Max-Age "0"
Header set Access-Control-Allow-Headers "Content-Type"

SSLProxyEngine on
SSLProxyVerify off
SSLProxyCheckPeerCN on
SSLProxyCheckPeerName on
SSLProxyCheckPeerExpire on
SSLProxyProtocol all -SSLv2 -SSLv3 -TLSv1

ProxyPreserveHost On
ProxyRequests Off

RewriteEngine On
RewriteRule /(.*) wss://192.168.88.100:8443/$1 [P,L]
RewriteCond %{HTTP:Upgrade} !=websocket [NC]
RewriteRule /(.*) https://192.168.88.100:8443/$1 [P,L]

ProxyPass / https://192.168.88.100:443/
ProxyPassReverse / https://192.168.88.100:443/

ProxyPass "/groupcall" "wss://192.168.88.100:8443/groupcall"
ProxyPassReverse "/groupcall" "wss://192.168.88.100:8443/groupcall"
Besides 443, you have to forward the range 1025-65535 of the UDP ports from the router to the VM.
NB: if working without domain names, e.g. no DNS available, forward TCP port 8443 from the router to the VM and then ignore browser's cert warning for https://your_external_ip:8443.
5 - Tenants & Aparts
By default, the Room-House Tower has no Tenants or Aparts. To add those, the WebAdmin allows to be configured properly. A typical configuration looks like this (Table 1):
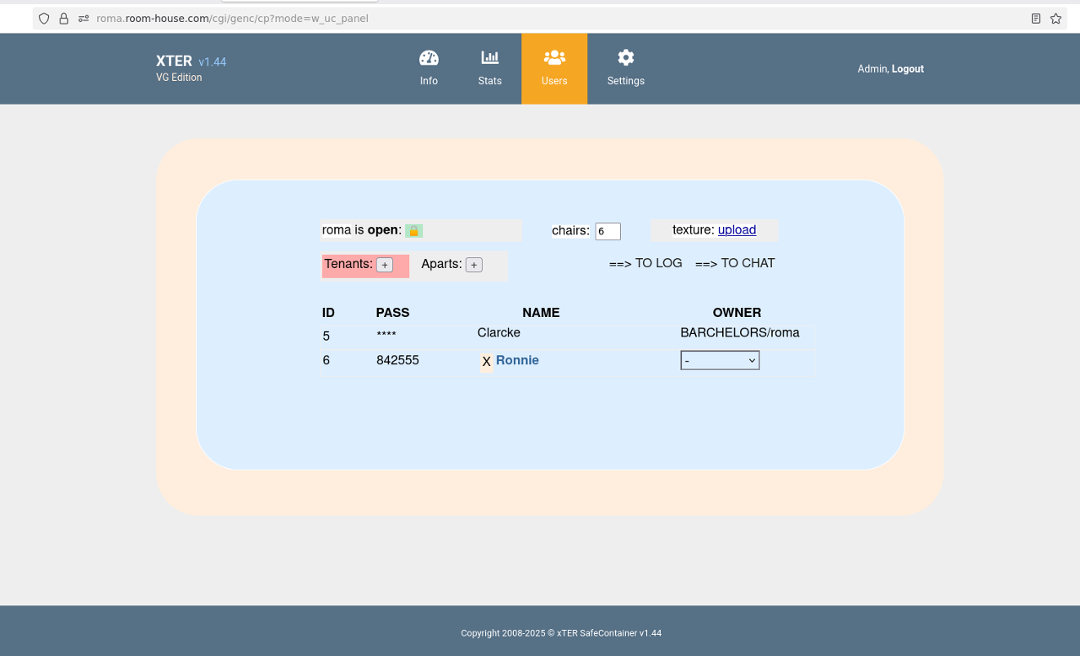
In the example above, "Ronnie" can login to the WebAdmin (https://online.mydomain.com/cgi/genc/cp) by typing 6 as username and the password 842555. Also,
"Ronnie" can enter the locked Lobby of the Tower "online" (https://online.mydomain.com) by typing 6842555 next to the captcha - if captcha is "1234" then it's "12346842555".
The Tower owner creates/edits/removes Tenants with guaranteed access to the Lobby (i.e. https://online.mydomain.com). When the Lobby door is locked, Tenants can still access it. The Tower owner can assign an Apart to a Tenant by selecting Apart from the right column "Owner" in Table 1. This Tenant becomes the "master" of this Apart and can then create other Tenants with access to this Apart. Example "Clarcke" is the master of the "Bachelors" Apart.
That much said, there are two types of Tenants: 1. those who only have password to access Lobby when it's locked (e.g. Ronnie); and 2. those assigned master of an Apart (e.g. Clarcke) who besides their own access to the Lobby and the Apart can also create other Tenants with access to this Apart (but not to the Lobby! Because Lobby is the Tower owner's own Apart).
This is simple to understand - the Tower owner gives the Office master key to the Office Manager who makes keys for every staff member.
When a Tenant becomes master of an Apart, it's not possible to see or change their password, nor even remove this Tenant - example "Clarcke". This is a security measure to protect the Apart master from being accidentally deleted, or password stolen. This is why assigning a Tenant to be the master of an Apart, the Tower owner is requested to write down the login and password of the assigned Tenant for no other reason than that it's not possible to see it again after this assignment has been done.
Upon receiving the Apart's mastership from the Tower owner, the Apart master can change their own password. Normally Tenants cannot change their own password, except Aparts masters.
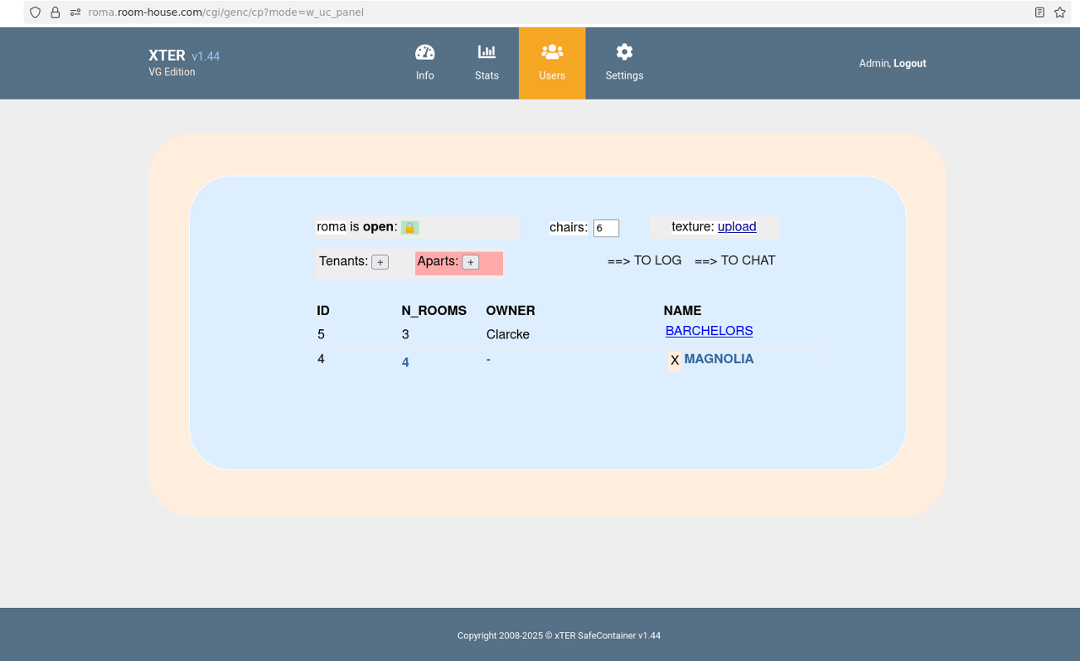
The Tower owner creates Aparts in the "Aparts" section (Table 2). Tower owner can set the number of rooms in an Apart by clicking on the number in N_ROOMS column of Table 2. Assigning any Apart to a Tenant in Table 1 makes it "immutable" in Table 2 - it cannot be renamed or deleted. Again, this is done for security because assigning Apart can be result of a purchase, so Apart master's rights must be guaranteed and protected against unauthorized or accidental changes.
6 - Apart Configuration
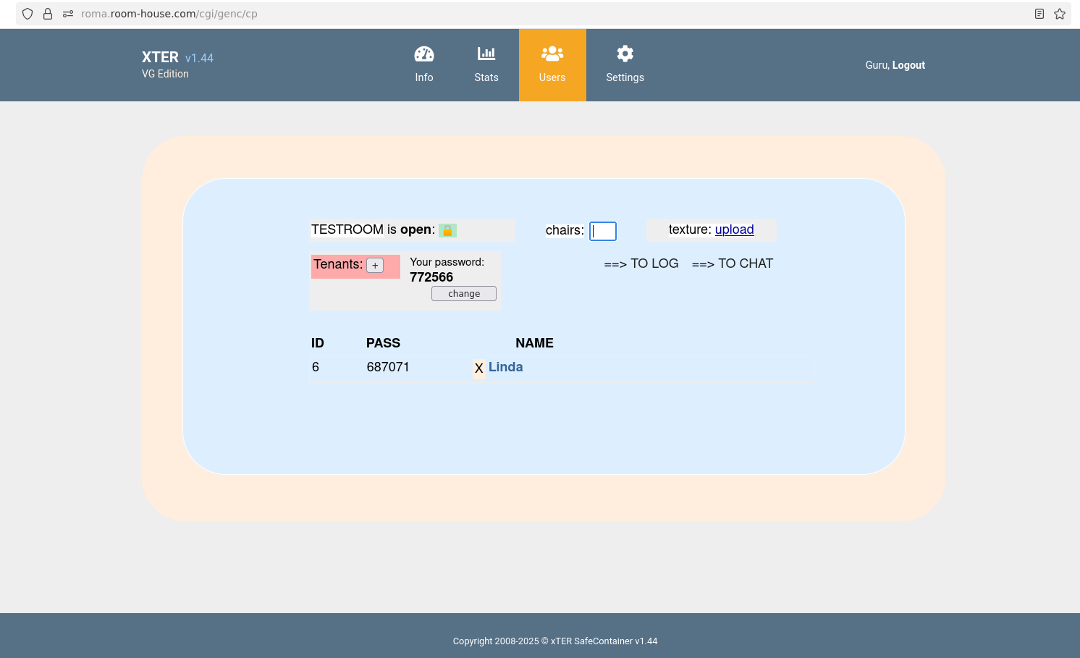
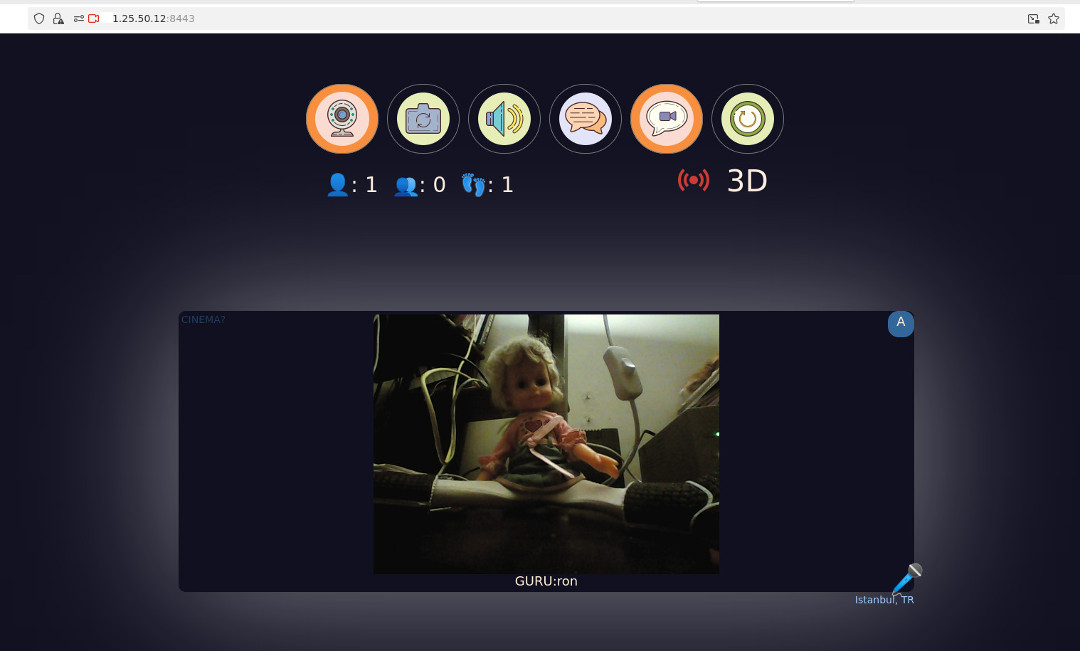
Configuring Apart is much like configuring Tower (see Picture) - with an add-on: a button to change the Apart's master password. Also the "Aparts" section is missing - because the Apart master cannot create new Aparts, only the Tower owner can do it.
Notice the empty field named "chairs" - this is a very important parameter that the master of Apart MUST set. Unless this number is set (default is EMPTY!), the Apart is not usable because there is no door to it: instead of the door there'd be "Whitelabel Error"; and the Apart master sets this parameter to an integer bertween 0 and 7. Number of "chairs" means number of people who can switch on their camera while in the Apart. If the master sets it to zero, no guest can do it - everyone has to ask the Apart master (a.k.a. GURU) by clicking on the yellow bell in the menu.
Only Tenants are allowed to switch on/off their cameras as they wish. So for example if there are 2 Tenants present in the Room, and a Guru is present, and the number of chairs for this Apart is set to 4 - then there is only one chair left for a guest. If there are two guests present, one of them can switch on their camera, but the other cannot and has to click the bell to ask Guru to activate their camera.
7 - Cinemas Configuration
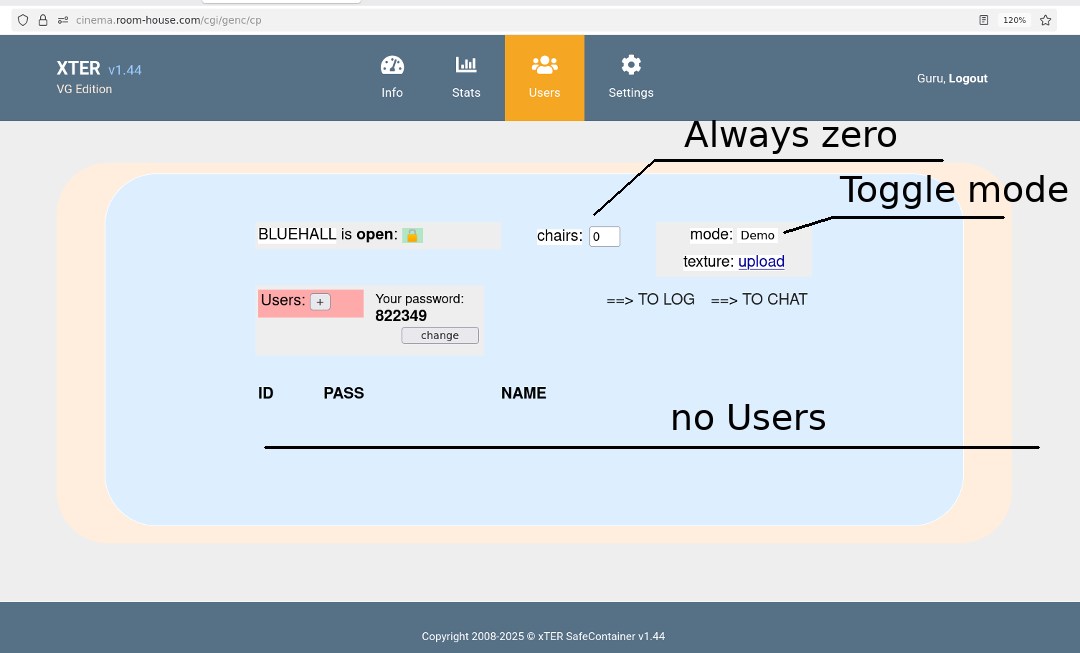
Configuring Cinema hall is much like configuring Apart (see Picture) - with some specific rules and a "Mode" button that is not for all Aparts. Writing this Chapter I assume that you're the Cinema Blue Hall master and have received the master's password from the Tower owner who has created "BLUEHALL" as a new Apart and assigned you as its master.
First, about the two rules. A. Do not add Tenants - this is not a good idea. So, no Tenants. B. Keep the number of chairs "0" - for the same reason as Rule A.
And the "Mode" can be toggled between "Normal" and "Demo". Try both modes and check the entrance to the Hall: https://your_tower_full_domain_name/#BLUEHALL, you wll understand the difference. When the mode is "Normal", there is a normal door to enter the Hall. Use this mode to get inside the Hall with your "master" password - doing it you receive a cookie for 10 days. After you've received this master's cookie, switch the "Mode" to "Demo" - everyone else will NOT use the door and instead will go to the Cinema with a "click-and-enter" way of getting inside. So, the "Normal" mode is for you, only, and the "Demo" mode is for all others, i.e. Cinema goers.
After your 10-day cookie expires, repeat the whole thing to get a new 10-day cookie by switching mode to "Normal", getting inside, and switching the mode back to "Demo".

If you're the Tower owner and want to have all three possible Cinema Halls functional - Green, Red and Blue - then create three new Aparts named "GREENHALL", "REDHALL" and "BLUEHALL" and assign them to three new Tenants, who of course can be the same person.
Then all three new Halls WebAdmin settings MUST BE visited by their masters, and the "chairs" field MUST BE set to 0 manually - only then the new Halls become functional. And you've read about this already in "Configuring Aparts" section above.
8 - Changing Host Name
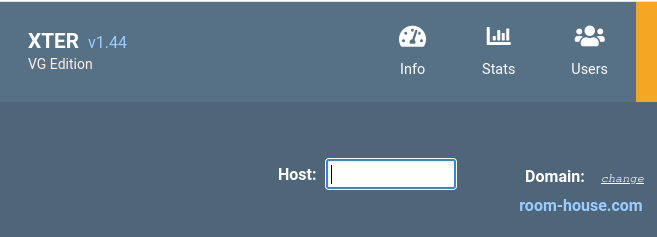
In "Settings", if the Domain is "mydomain.com", and the current value of the Host is "online", and the Certbot RSA keys for "online.mydomain.com" are uploaded successfully, then the Tower address is "https://online.mydomain.com". And everything works fine.
But what happens if you've uploaded "wildcard" RSA keys good for "*.mydomain.com"? Your Tower is still working fine. Moreover, now you can add ANOTHER TOWER with address, let's say, "mybesttower.mydomain.com". How? Simple - change the Host in "Settings" to "mybesttower", - and this is it, then set "chairs" in the "Users" section of the menu.
Now check https://mybesttower.mydomain.com - and it's working! you have either of the two Towers working.. how so? Do not forget that both "online.mydomain.com" and "mybesttower.mydomain.com" MUST resolve to the same static IP of your router, and in case the port forwarding is done by the host Apache - then both these names must be forwarded to the bridged virtual internal IP.
If you're following the line, changing the Host in "Settings" is equivalent to switching between working Towers. Now it's Tower1, then it's Tower2, then again Tower1, Tower3, etc. What are situations when one has need to switch Towers? that's a more difficult question, but if you want it, you must have it.
9 - Work Without DNS
In "Settings", change Host value to the first octet of your router's static IP. For example, if it's "81.84.186.123" then set Host to "81". Go to "Users" and set "chairs" manually, again.
To work without domain name, you may have to forward port 8443 from the router to the VM. Probably it's free on the router, because it's not a standard port. And Apache proxy can't help with IP-only setup because it'd need good certs which you don't have or can't use.
Now open https://81.84.186.123:8443 - And everything works fine. The WebAdmin then would be at https://81.84.186.123:8443/cgi/genc/cp.
Ignore the browser warning and complains about SSL certificate - because you're not using any domain name.
NB: if the port 443 is free, then the URL is just https://your_ip and https://your_ip/cgi/genc/cp, i.e. no 8443 port required.
3 - Backup
1 - VirtualBox Snapshot
Use VirtualBox manager to create a backup of your Tower. It's called "snapshot" in the VB menu. One good moment to create a snapshot is this (see Picture).
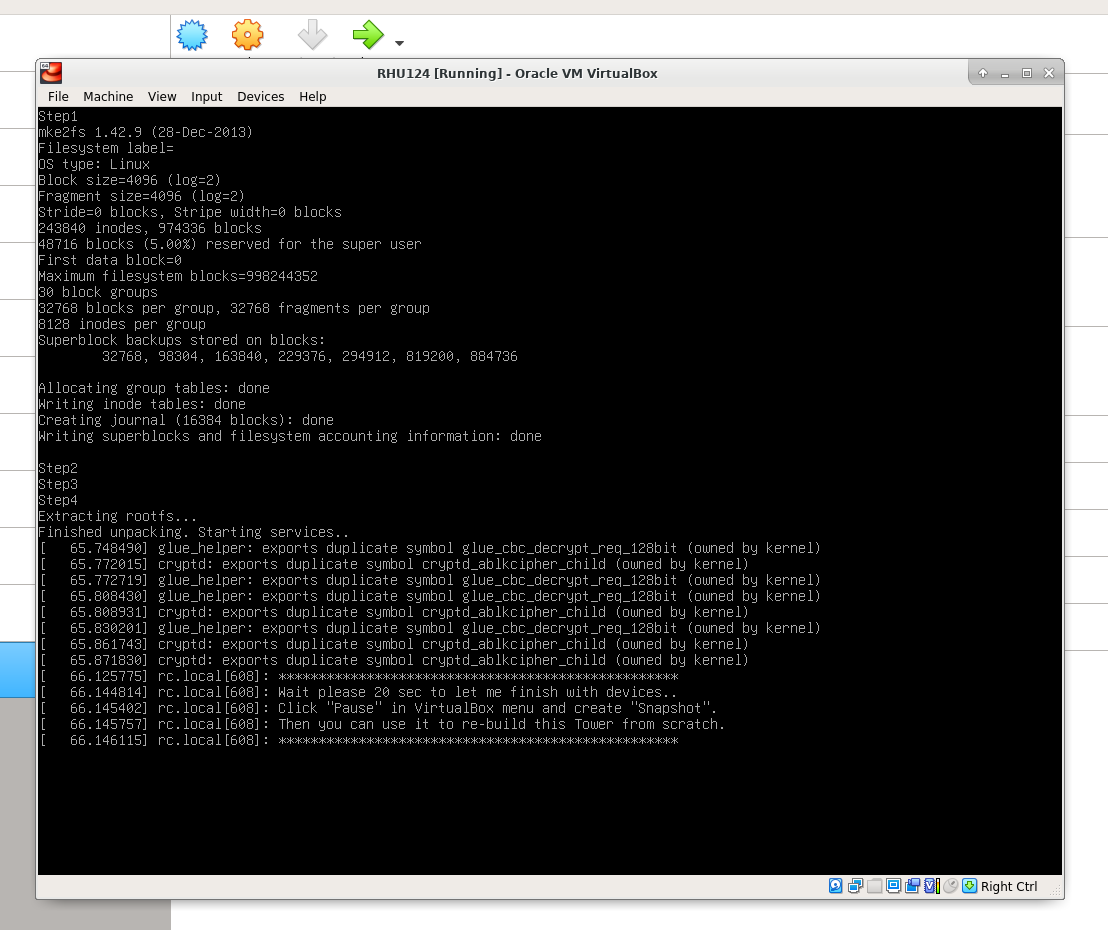
While building the Tower - which means the very first time you load the files and unpack them - there is a 20-sec pause when the system holds on in waiting for activation of all devices. Click on "Pause" and then create the Snapshot#1. This is the point that you will be able to return to and re-build your Tower from scratch.
In a similar way create other snapshots in VirtualBox at different stages that will be your Tower backup files.
On Linux, another way to create a backup is to use rsync when the VM is switched off.